Wednesday, August 21, 2013

The Bunny Ears

When it came time to making a set of bunny ears for my white rabbit costume, I went hunting around on the internet for some inspiration. I found some great images and some horrible tutorials, so I thought I would add to it all with a tutorial of my own (hopefully not horrible).
I took the same approach that you would take if doing millinery, so there is no glue involved in my process.

Materials – paper, pen, scissors

Step 1
Come up with your pattern. After looking at many pictures of adorable bunnies and bunny costumes, I decided to make my ears in proportion with my head. I measured the height of my head to choose the length. From there, I measured a flat point of 7cm across the bottom and then free-handed the curve of the ear. I folded the ear in half and made sure both sides were the same.

Materials – paper scissors, stiff buckram, millinery wire, pliers, fabric scissors, bunny fur (outer ear), polar fleece / felt (inner ear), small embroidery or manicure scissors, matching thread, hand-sewing needle, fabric pen

Step 2
Transfer your pattern shape onto your buckram and cut out directly. This is what the paper scissors are for (you don’t want to destroy fabric scissors). Cut out the same shape in the inner ear fabric. Trace the ear shape with about a 2.5cm seam allowance onto the wrong side of the fur fabric. Use the small embroidery scissors to slide along the wrong side of the fur fabric to cut out your shape. Make sure to cut two of each.
Step 3
Cut a length of millinery wire long enough for the edge of the ears plus about 20cm. Leaving 10cm at the end of the ear, start sewing the wire to the edge of the buckram. I use a simple whip stitch using a double strand of thread. Repeat on the other ear.
Step 4
Position in the inner ear fabric onto the buckram on the same side as the wire. Stitch the fabric on with a running stitch close to the edge.
Step 5
Trim your fur. Using your embroidery scissors, trim about 1cm of fur away from the backing. This will be the seam. The reason for trimming is to make it neater to sew on and reduce the bulk from the seam. It also stops extra bits of fur from getting caught in the seam.
Step 6
Position the buckram ear onto the centre of the fur. Wrap the fur around the edge, fold in your seam allowance and pin in place. It can be a little bulky around the top of the ear, but if you just ease it in, it will fit.
 Step 7
The tricky part. I used a whip stitch here, but you can use what you feel comfortable with. Slide your needle under the edge of the fur fabric, catching in the inner ear lining fabric. This is to sew the fur to the ear. Sew all the way around the ear to secure. You may need closer stitches at the top of the ear to secure the eased fabric.


Step 8
Now you can attach your ears to your chosen headpiece. If you are going for a headband, pick a tight one, the ears can weigh quite a lot. Once attached, bend the ears to your chosen position.

Tuesday, August 20, 2013

Alice takes tea

On Saturday, I attended an event with the Australian Costumers Guild – a trip down the rabbit hole for an Alice In Wonderland themed High Tea. We made the journey over to Mount Gravatt to the Willows Tea Room where two of our members had booked us in.
We had a smaller collective of members in attendance, but we all had a lovely time. We had three Alice’s – a blonde, a brunette and a red head. We had three red queens – a Disney, an inspired by and a Tudor. And me, as the white rabbit.
The food was lovely and a great spread for the price with an assortment of sandwiches, scones, tiny cakes and cookies and mousse to finish it off. I chose to sip from a cup of Super Hero tea – a tasty green tea blend with citrus and mint. The combination proved a little too rich for me after a previous bout of food poisoning at an ill-fated trip to the pancake manor, but it was a lovely afternoon out.
As for my white rabbit costume, when I was planning for the event, I couldn’t decide which way to go. I have done Alice before and didn’t have any aspiration to repeat it. And I’ve done the White Queen which I wore out and no longer have. I then had the difficulty of tossing up doing the Mad Hatter (done that too), the Cheshire Cat, or the White Rabbit. I decided to be a bunny. I used the pattern that I had drafted up for my Saber Lion costume, so it was a simple matter of recutting it out in white polar fleece. I added a padded fur tummy patch, leather footsies, and a tail. Then came the ears (which I will follow up with a tutorial). I attached them to a plastic headband and hid it in my white hair. I topped the ensemble off with a few piece from my Lolita collection – a vest, a neck frill and a bow tie. I’m not 100% sure that I like how it turned out, but a bunny suit will always come in handy in the future – it’s just not a great idea for warmer weather.

Thursday, August 8, 2013

Steamfest Australia 2013

It was a weekend full of Steampunk fun. Last weekend, I attended the brand new Steamfest Australia – a music festival/convention held in Ipswich. I was lucky enough to be attending with EDAS (European Defensive Arts School) for the weekend. We were there to provide demonstrations on the Bartitsu club and just play around for fun. While I got free entry to the event, I did however mean that I was up with the crows to get out there and set up our site. It’s about an hour drive from my place on the northside of Brisbane (thank god for the motorways), but it still meant that I had to be ready and on my way be 7.30am on a Saturday morning. I did pack my car the night before.

The event itself was quite interesting. I give full props to the organisers who did a fantastic job considering that this was their first event. One of the major drawcards was unable to get a visa into Australia and had to pull out at the last minute, which was a real shame. And the event did have its issues. Poor advertising of the event itself and the event program, few activities other than perusing market stalls and listening to music. So, there is definitely room for improvement.
On the other hand, EDAS we there to provide entertainment. I took along my shade so that we would be able to keep the sun off ourselves when we were resting between sets. And while, I didn’t participate in the cane, boxing or sword as it has been too long since I last attended training, I did run a calisthenics session each day – with public participation. We looked stupid, but the background music of the bands was a perfect accompaniment to our exercise.
 
As for what I wore…

Despite the fact that I have two safari ensembles for Steampunk, I decided to go against one of them. Namely the version that I made with shorts, which I was planning to wear on Saturday. Looking at photos of myself in the images, I just don’t like the look on me. Let’s face it, I have a high waist and short legs, so skirts look much better. Of course, I decided this two days before the event. With that in mind, I had to come up with a quick new ensemble from what I had in my wardrobe. In the end, I came up with this.

My character is the Madame of the harem. The idea being that I keep the harem girls safe and secure. And that’s what I have tried to create with the influence of India in my ensemble with both jewellery and the sari, yet still maintaining the element of the English influence through the bustle and corset. I really like how the outfit came together, so much so that I am thinking I might develop the costume more in the future and keep it as one of my costume options. I also really like the idea of being able to use parts of my wardrobe for more than one costume. I was originally just going to drape and tuck the sari, but decided in the end to sew it for ease. The bulk of the fullness that hangs over the back of my bustle is pleated onto a piece of twill tape that ties at the waist. The front section the pins across to meet it and the remainder of the sari is draped across my body and over my shoulder. The belt helps keep it all in place and gives me somewhere to hang items such as my keys and weapons. I topped it all off with one of my black character wigs, plaited down my back.
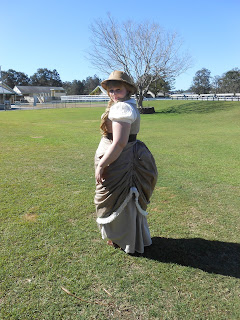
Then on Sunday, out came the safari outfit. The colours are all muted as were used throughout the Victorian period when on safari. My fabrics are all cotton as well, so it breaths nicely. The outfit is made up of two skirts and an apron, a blouse and a vest, with my Victorian corset and bustle pad underneath. I decided to be blonde for the day and went with two long plaits in my hair under my safari hat. I love this outfit, so was more than happy to wear it.